Hi folks. After some lengthy reads (brioche suprêmes, Firecrackers), I’ll cut to the chase today. I’m just back from some time in Asheville for the bread festival and still chewing on the themes of whole grains and milling. Along those lines, I’m offering a baguette made using the “en bac” (or “Retrodor”) method, which might be my best yet. A little context first, then the recipe. Thanks for reading.
The good baguette
Everybody wants to make a baguette. Yes, sourdough, yes, brioche and danish and laminated whing-dangs, but the baguette ... that’s the thing, right?
I posted a video this week on my Instagram of my baguette, cooling and crackling. A baker I admire responded with “#GOALS.” “I am not happy with the consistency of my baguettes,” she said. To which I replied, “Your job as a baker is to always feel insecure about your baguettes.” That’s just how it goes. Live by the sword, die by the sword.
In my book I frame the baguette as the triple salchow of baking: mid-air spins, toe-tip landings, hard falls. While I’m not promising anything here (anyone that’s been around the baguette block, so to speak, knows that the ice is slippery), I do think that for a reliable, malty yet grain-forward, and reliably open-structured baguette, this method is the way to go.
Notes on the method:
Flavor: The flavor profile with this process favors grain more than fermentation. If you want the flavor of fermentation, go with something like a poolish or sourdough baguette, which boast yeasty or acidic profiles (recipes in my book). I do add a very small amount of sourdough culture to today’s baguette (I think that unrefreshed is ok for those of you who are intermittent feeders) as it slightly boosts the flavor. I suspect that I could dial up the amount a bit, but it’s the baker’s choice. As I’ve noted, the strong hand here is malty and nutty with a tender texture — too much sourdough and the crumb will become rubbery. As with most baguettes, if they aren’t eaten within a couple hours of baking, either re-crisp them briefly, or split them open and toast them for a minute or so.
Handling: This dough is slack and somewhat sluggish. I’ve found that too much activity leads to a finer, less open crumb, and a more cottony texture — I don’t like that as much. So my sweet spot is a low percentage of yeast and just a little sourdough culture for depth. Hopefully you’ll find what I suggest to be only a starting point and set your own destination.
Bake: It’s key to have lots of heat and ample steam. Without both, the breads won’t open, ear, or brown. A full bake also helps to pull out the high moisture and set the crust.
Flours: I’m using 80% King Arthur all-purpose (11.7%) and filling in with freshly-milled whole wheat for the other 20% (in baker’s math percentages). I’ve made these with all manner of flours from a graham-type flour (the King Arthur Irish-style flour) to freshly-milled spelt, whole wheat, Khorosan, and even “high extraction” flour. All are wonderful and I don’t have a favorite. With the weaker flours (the spelt or the Irish-style, above) you can expect less oven spring as well as some occasional tearing (they lack the extensibility of stronger flours). But, in return, they offer a tenderness that’s appealing as well as a creamy, nutty flavor and crumb colors in the range of a café au lait.
Last, if you are new to baguettes, I don’t necessarily recommend these as a place to start. Sure, you can jump in the deep end, but better success will be had in the shallow end while you work on nailing each element (shaping, scoring, steaming, and loading). A great place to start your journey is this recent baguette video on the King Arthur YouTube channel. If you like that, you can also graduate to this sourdough baguette which uses some freshly-milled Khorosan from a MockMill.
Martin
In 2012 I was in a BBGA class with Mike Zakowski, he was teaching his breads from the 2012 Coupe. As an add-on to the curriculum he demonstrated some decorative baguette work. Using a formula he developed with whole-grain flour and a chilled overnight period for fermentation, Mike wowed us with his shaping, scoring, stenciling, and scissor work. (He is, and will always be, in his own skill class.)
After the class, back at the bakery, I began playing with a version of the method he used (often referred to as “en Bac” or “Retrodor,” meaning “in the tub” or “Retrodor” for a mill that’s associated with the method). That’s the origin story of this bread, for me. I owe Mike for more than just this formula — he sets a bar for all of us to aspire to.
The good baguette
Yield: 3 demi-baguettes (I recommend doubling this amount)
All-purpose flour (11.7%), 313g
Whole wheat, freshly-milled*, 78g
Water, 325g (in a 67 degree room I use 85˚to 95˚ degree water)
Salt, 9g
Yeast, dry, instant, 1g
Sourdough culture**, 23g
*Bagged whole wheat will also work, as will spelt and many other whole-grain flours. Just be aware that weaker flours will take less water, resulting in a softer, stickier dough.
**A ripe liquid- or stiff-consistency starter will work. The difference in hydration is negligible at this batch size.
In a medium bowl combine all ingredients and stir with the handle end of a wooden spoon to combine. Once the mass is mostly homogenous, switch to a flexible scraper and clean the sides, scraping, pressing, and smearing the dough to fully combine. Transfer to a lightly oiled container (such as a 4 quart cambro). The dough should measure between 74˚ and 78˚F. Cover the container and set a 30 minute timer.
After 30 minutes, perform a bowl fold. Lift the side, stretching upward, then press into the middle. Repeat this, working around the dough, for a total of 8 to 12 stretching and folding motions. Invert the dough after the fold, placing it seam side down in the container. Cover and rest for 30 minutes.
After the rest, place the dough in the refrigerator to chill for 8 to 12 hours.
After the cold fermentation, remove the dough and allow it to warm to roughly 65˚F. Depending on ambient conditions this may vary. In my 65˚F house it takes 2 hours.
To divide, lightly dust the top of the dough then release the sides using a flexible scraper. Dump the dough onto a lightly floured surface. Lightly dust the top side then divide into three equal pieces, roughly 250g each.


Preshape the pieces into loose tubes, about 5.5” to 6” wide. Rest seam side down, covered, for 10 to 15 minutes.
While the pieces rest, prepare a baker’s linen or “couche,” lightly dusting it with flour from a sifter.
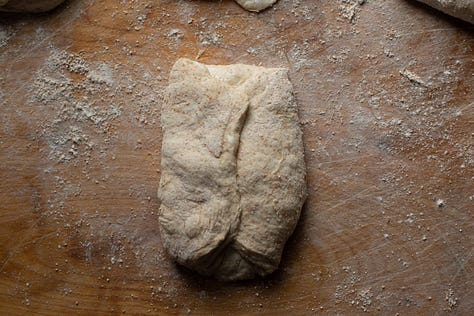
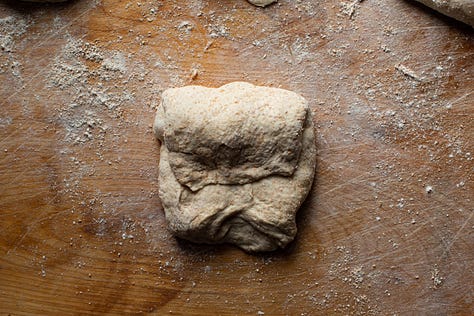
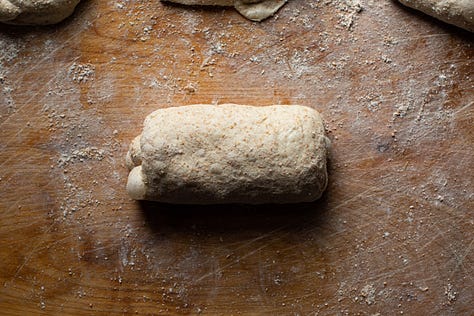
To shape the baguettes, place a tube preshape seam-side-up on a lightly floured surface. Pat briefly to remove any large air bubbles then gently stretch to a width of 7.5” to 8”. After stretching, fold the tube like a letter along its long axis, then fold the edge furthest away to the leading edge, lightly pressing to seal with the heel of your hand. (Let’s acknowledge that this is hard to understand or describe if you haven’t shaped a baguette before. Please have a look at the video link, above, for a better view of the process.)
After shaping, place the baguettes on the floured couche, seam-side-up, and set to rise for 45 to 60 minutes. While the baguettes proof, preheat the oven to 500˚F with a baking stone or steel as well as your steaming mechanism in place.
Note: if you are new to scoring baguettes or have previously struggled, I recommend placing your baguettes on a sheet of parchment (which you will eventually slide onto your preheated baking surface as I do in the video, above) towards the end of proofing and chilling them for 5 to 10 minutes. This will help the surface to firm some, facilitating the cutting process by slightly drying the skin.
Score the baguettes, load, then steam. After 5 minutes reduce the oven to 475˚F and set a timer for 15 minutes. At 20 minutes of baking, check the loaves for color (including the bottoms) and continue until they are deep golden brown. In most ovens 22 to 24 minutes should be enough for a baguette of this size (250g). If, after 24 minutes, you don’t have the color you want, consider not reducing the heat (to 475˚F) for subsequent bakes. In other words, with baguettes, it’s better to raise the oven temperature and keep the bake short than it is to bake for a longer period of time.
Cool briefly, and enjoy.
Thanks for reading. Please consider subscribing and sharing, let’s keep it going.
Martin


Thank you!
This method is new for me.
How much should the dough rise in bulk fermentation?
50%?
Thank you for this! I enjoyed reading it and am excited to give it a shot.